
Version control starts with Main
Every new agent starts with a Main branch, its first saved version and 100% of new conversation traffic. Open Version control to see its history, create branches or change the traffic split. There is no enable step. Agents created earlier start their version history from the current configuration when you open them. Versioning stays on. A version saves prompts, model, greeting, appearance, knowledge, actions, procedures, shared resources, specialists, the workflow, tests, evaluation criteria and voice settings, including emotional delivery and channel behavior. Wait for changed knowledge to finish syncing before you publish.Edit and publish a branch
The agent editor works on one branch at a time. Under the agent in the sidebar, the branch row shows which one. Open it to switch branches, see each branch’s traffic and last update, or choose Create new branch. Search by branch name when the list grows. The Agent page and the Workflow builder save your edits before switching branches, and other forms warn about unsaved changes. Edit the agent as usual. The Agent page and the Workflow builder save to your draft as you go, and other forms keep their own save buttons. Preview runs that draft straight away, so you can test a change before anyone else gets it. Live conversations keep using the published version until you publish. An amber dot on Publish in the top bar shows that the branch has unpublished changes. Choose Publish when you’re ready. Review changes names the agent, the branch and its traffic, and shows the same comparison as View pending changes. Commit message starts with a summary of what changed, built from the change list. Edit it, then choose Publish to save a new version of the branch. New conversations on that branch use the published configuration. Conversations already in progress keep their assigned version. The arrow beside Publish also:- opens View pending changes, described below
- publishes to a new branch, leaving the current branch as it was
- opens Deploy traffic once the agent has a second branch, and the list of all branches
- copies a link to the branch or to its latest version
- discards changes you have not published
View pending changes
View changes compares the published version of the branch with your current changes. A dot marks each tab with something to review.- Overview groups the changes by area. Text such as the system prompt shows the two versions side by side and marks the words that differ. Long unchanged passages stay folded until you choose Show unchanged. Short settings read as the old value, an arrow and the new value. Each changed knowledge source is a chip, green when added, amber when modified and red when removed. Choose one to read the source and what changed in it.
- Workflow draws the graph with modified, added and removed steps marked, then lists the steps and connections that differ. Hover a step to see which fields changed, and choose it on the graph or in the list to see each change. The expand button opens the graph full screen.
- Raw JSON compares the saved configuration line by line. Choose Expand to open the lines between two changes.
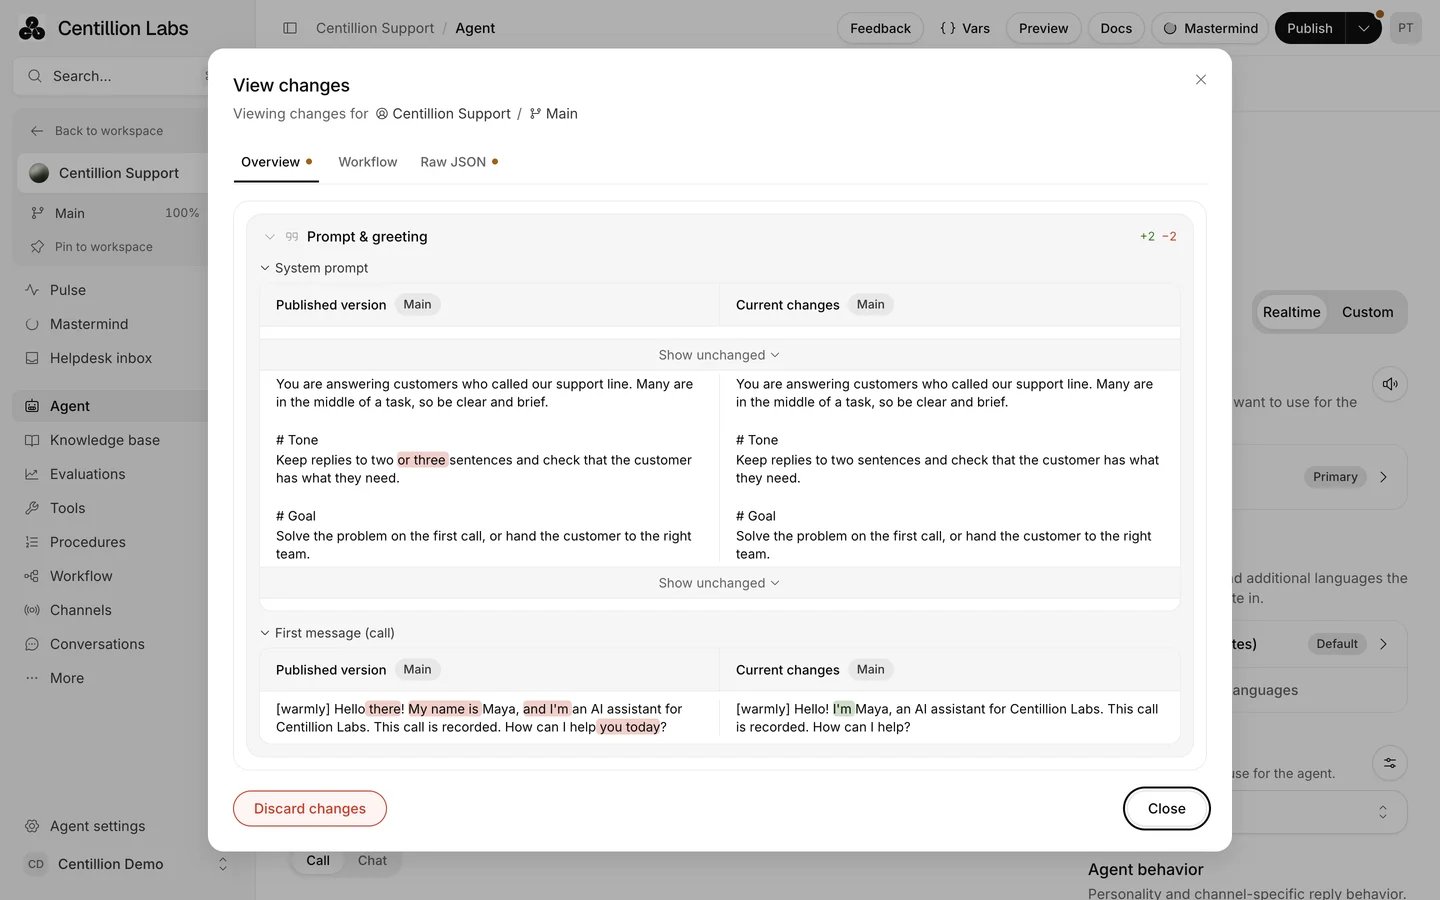
View changes marks the words that differ between the published version and your draft.
Preview a conversation
Opening an agent lands on Pulse with Preview open beside its charts. Agent → Configuration also opens Preview beside the editor. The top-bar Preview button closes or reopens that panel. Use Open fullscreen preview in the panel to open the full conversation view. On other agent pages, the top-bar Preview button opens the full view directly. Select the branch at the top, then send a message or start a voice call. The preview uses that branch’s saved draft. Your Agent page edits save first, so a conversation starts from what’s on screen. Save any other open form before entering Preview. Switching branches starts a new conversation. Preview runs the same agent your customers reach. It has the branch’s prompt, knowledge, procedures, tools, actions and workflow, and a preview call runs on the same voice pipeline as a phone call. Mock tools decides what those tools really do, so testing the agent doesn’t reach your customers. Preview follows the System prompt, First message and voice settings you entered. With a blank First message, the agent waits for you to speak first. Nothing is dialed. A preview runs as an inbound conversation in your browser, sosystem.direction reads inbound. To try the outbound path, set
system.direction to outbound under Vars and start a new conversation. To
name the person it reached, set contact.name the same way. See
Test both directions in Preview.
Voice preview works before you enable live voice, including on the Free plan.
It uses your workspace’s available message credits. Plans without live voice
can run one preview call at a time. Starting a preview leaves live voice off.
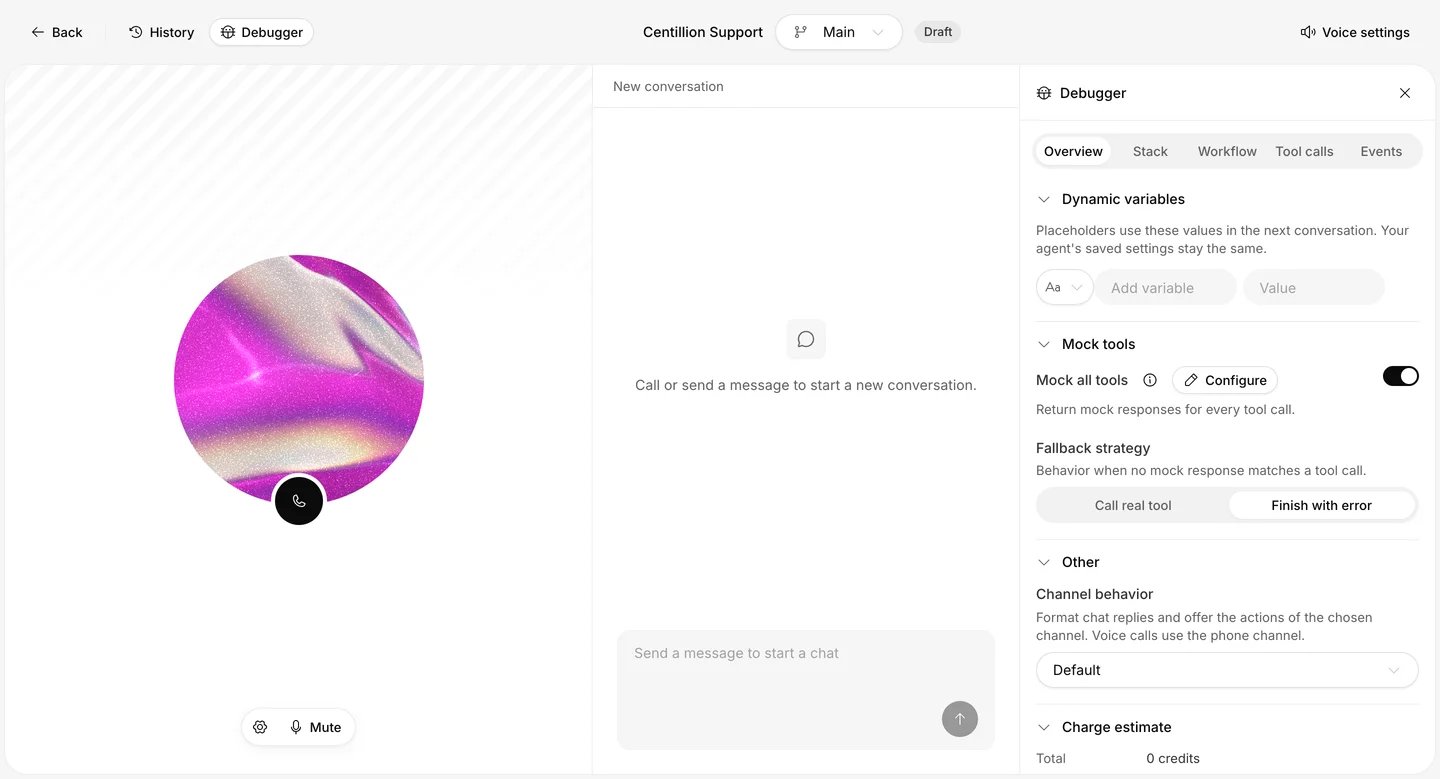
Preview with the Debugger open, before a conversation starts.
[warmly], appear as colored chips in the transcript.
Each emotion keeps the same color across the editor and all Preview views.
Custom directions such as [thoughtfully] also appear as chips. Add descriptions in
behavior settings to guide when the agent uses them. Mute,
audio devices, typed messages and End call remain available in either view.
While the call starts, it reads Connecting… and then Agent is joining…
until the agent is in the call. It then opens with the branch’s First
message, or its workflow’s first words, as a caller would hear. With neither,
it waits for you to speak.
The call doesn’t wait for your microphone. If your browser or computer hasn’t
answered yet, the agent still joins and Preview says it’s waiting for your
microphone. You can type until it does. If access is refused, the call ends and
Preview shows why.
If you change settings during a conversation, Preview shows a Restart notice
once they save. Restart to try them in a new conversation. A live call continues
until you end it; end that call before restarting.
History lists your preview conversations with their branch; choose one to
read it again. After a call ends, its saved transcript updates automatically.
Choose Review call to open its recording and details, or View conversation
for a chat. Each preview also appears in
Conversations, labelled Draft preview. Voice
previews save audio automatically, subject to the same caller opt-out exclusion
as live calls. Audio is kept for the agent’s recording
retention period; the call reads “This call is
recorded” while it runs. Voice settings picks the agent voice for the next
call without changing the saved agent. During a call, the gear button next to Mute
selects the microphone and speaker. You can also type during a call.
Set text, number or boolean values for a conversation with Vars in the full
view’s header. With the Debugger open, Vars moves to Overview, along
with Mock tools. Variables found in the branch’s prompt, first message and
tools appear automatically, and the last row adds your own. Values apply as you
type, and they apply to the preview only. Your saved agent doesn’t change.
Vars in the top bar stores reusable text, number and boolean test values for
Preview. Preview never calls the live initiation webhook. Live calls need their
own values; test values are not production defaults. See
Personalization.
Mock tools starts on. Choose it to turn Mock all tools on or off, then
open Configure to search the branch’s tools. Choose a tool to add its mocks,
set the conditions each one matches and write its response. Save stores the
mocks on the tool, where its editor shows them too. A tool with no mocks answers
with success. The agent’s other actions, such as a Slack notification, a custom
API or a booking calendar, answer with success too, and Tool calls in the
Debugger lists them as mocked. Fallback strategy decides what happens
when a tool has mocks and none of them matches the call:
- Finish with error ends the preview turn with an error, without calling the tool.
- Call real tool runs the tool. Webhook tools can use variables that point to a test system. Client tools need their application to supply a response.
- Overview holds the variables, the mock tool settings and Channel behavior, which formats chat replies for a channel such as Email, WhatsApp or Slack and offers that channel’s actions. It also shows a charge estimate for chat replies and the conversation’s branch and session.
- Stack lists the active agent or workflow step and the knowledge sources the replies used.
- Workflow draws the branch’s workflow before the conversation starts, then marks the current step and the path taken. Zoom and fit controls sit on the canvas.
- Tool calls shows each call’s input and response and whether it was mocked.
- Events lists each reply with its source and any error.
Branches and traffic
Create branch starts a branch from another branch or, in its history, from any version. A new branch gets no traffic. The Branches tab shows each branch’s share of traffic, its conversations in the last 7 days and how many versions it is ahead of or behind Main. Search branches, filter by status or creator, and select Name, Traffic split, Conversations (7d) or Updated to sort the list. Clear filters resets the search and filters. Traffic split opens Deploy traffic. Enter each branch’s percentage; the total must be 100% before you can deploy. All traffic gives one branch 100% and sets the others to zero. Reset to current split discards changes in this dialog. Publishing a draft and deploying traffic are separate actions: the split uses each branch’s published version. A conversation keeps its branch and version even if traffic changes; new conversations use the new split. Traffic split → View history lists every deployment. From a branch’s menu you can rename it, copy its ID, protect it, let it pick up Main’s new versions automatically, deploy it or archive it. Main and branches receiving traffic cannot be archived. Filter by Archived to unarchive a branch. Each agent supports 30 active branches. Archiving the branch you are editing saves its draft and switches the editor to Main.Review history
The clock beside a branch opens its versions. Search by version, message or author, or filter by type and author. Each version lists the areas it changed, such as Voice or Workflow. Open a version and choose Previous or Live under Compare to, with the same tabs as View changes. Choose Revert to this version and confirm to publish that configuration as a new version. History stays intact, but your unpublished draft on that branch is cleared. The live version has nothing to revert to, so its button is off. If the branch receives traffic, new conversations use the reverted version. You can also Create branch from version to work from it separately. Graph draws every branch as a lane with its merges; search it to find a branch or version.Merge changes
Choose Merge branch to bring one branch into another, or Open merge proposal to ask for review first. A proposal has a description, reviewers, comments and a Changes tab. Reviewers approve or request changes. A protected branch needs an approval before a proposal can merge into it. Proposals can be closed and reopened. Search proposals by title, number, branch or author, or filter by status, creator or reviewer. Clear filters resets the search and teammate filters. Write and Preview let you check Markdown in descriptions and comments before submitting. A comment you are writing stays in place when you switch between Conversation and Changes. When both branches changed the same setting, the most recently updated value is kept and the setting is flagged. Merging into Main moves the source branch’s traffic to Main and can archive the source branch. If that source is the branch you are editing, archiving it also switches your editor to the merged target branch. Pull in changes from Main brings Main’s new versions into a branch. Where both changed a setting, the branch keeps its own value.Compare branches and contributors
Choose See analytics in Version control to compare conversations, completion, messages per conversation and evaluation results for each branch over the last 7, 30 or 90 days. The button is available even when Main is your only branch, so you can check its performance before creating an experiment. Draft previews are excluded. Rate differences are percentage points, shown as pp, compared with Main. Returning to Version control keeps your selected branch. The Contributors tab counts versions published or merged into Main per person over a period you choose. Draft edits and other branches are excluded.Reuse knowledge and tools
Open Knowledge base or Tools in the workspace sidebar to create shared resources. In an agent, choose Tools → Add tool to search workspace tools and filter by type or creator, then select each tool you want to use. Attached tools appear on the agent’s Tools tab, and MCP servers on its MCP tab. Remove from agent keeps the shared tool in the workspace. For knowledge, use Knowledge base → Shared library.
Library edits reach agents using their current configuration. Published
versions keep their saved resource versions until you publish another version.
Imported knowledge does not follow future source edits. Archiving a tool stops
execution in every version. Removing knowledge from a branch draft leaves
published versions unchanged; removing the source from the workspace stops
retrieval in every version.
Open a tool from Tools to see its panel:
- Overview shows who the tool is shared with, its tool ID, how many calls it has logged with their average latency, and the agents that use it. Charts show its average error rate and latency, hourly or daily, over the last 24 hours to 90 days, in UTC.
- Settings holds the configuration. Test Tool runs the saved tool with a value you type for each parameter, live or against a mock, and Edit as JSON edits the whole configuration. Under Advanced, Error handling sets what the agent reads when a call fails: Auto passes the tool’s own error response and hides failures inside Centillion Labs such as a timeout, Summarized gives a short plain summary, Passthrough the exact error, and Hide only that something went wrong.
- Mocks answer the tool’s calls in tests. Mocks are checked top to bottom, and the first one whose conditions all hold returns its JSON, as an error if you turn on Return as error. A condition checks one parameter for any value, an exact value, a regular expression, or a meaning the LLM judges. LLM conditions are checked in test runs, not in Test Tool or the preview.
- Tool Logs lists each call with its time, agent and branch, status and latency. Filter by status or date range, and expand a call to see the requested URL, the request body, the parameters the LLM extracted and the response. View opens the conversation. Values a workflow marks sensitive are masked, request headers are never logged, and a conversation’s tool logs are deleted with it.
Design a workflow
Use a workflow for the phases of a conversation and Procedures for reusable tasks selected by customer intent. A procedure can start from any workflow node. A structured procedure keeps that node in place while its steps run, then returns control to it. Procedures cannot be restricted to individual nodes, so keep required verification inside the procedure and its tools. Open Workflow to design how a conversation moves between steps. Every conversation begins at Start. Connect Start to a first node to turn the workflow on; disconnect it to turn the workflow off without losing it. If you set up specialists before, they open as an equivalent workflow. Use the plus under a node, or drag from a node’s lower handle onto empty canvas, to add one of these nodes:
A subagent’s card shows how many tools it adds to the ones it inherits, and a
Tool node’s card names the tool it dispatches.
Select an edge to set when it is taken. Its Forward and Backward tabs
each have a Transition type: Unconditional (always taken), an LLM
Condition the model decides on, an Expression over conversation
variables, a tool’s Result condition, or None for no transition that
way. Expressions combine text,
numbers, true, false, null, variables and values the model evaluates, with
logical, comparison (including Contains), arithmetic and conditional
operators. Variable is set is true once a variable holds a value. A
variable holding null reads as not set: an optional update the conversation
gave no value for writes null, and so does a response field that comes back as
null
(see below). Empty text still counts as set; to treat it as missing, use the
variable on its own as the condition, which is false for empty text, 0, false
and null. A Required variable never receives a blank LLM evaluation
answer (see Required values): it keeps what it held before, so Variable is
set stays false when it held nothing. The variables
system.hour, system.weekday and system.date hold the current time in UTC,
and system.now holds it as an ISO 8601 timestamp, such as
2026-10-24T19:01:00Z.
A Backward condition on the same edge returns the conversation to the
earlier node.
A node’s Edges tab lists its outgoing edges, and they are evaluated from
the top down: the first one that holds is taken. Drag a row to reorder it, or
focus its handle and use the arrow keys. Put an Unconditional edge last to use
it as a fallback: the conversation moves on along it once the LLM conditions
above it don’t hold. An LLM condition above an Expression or Unconditional edge
adds a short model check on the turns where the edge below it holds, so list
those edges first when the order doesn’t matter.
Give a step its own LLM settings
A subagent runs with the agent’s LLM settings: its backups, temperature, reasoning effort, token limit and parallel tool calls. Turn on Override LLM settings on the subagent’s LLM tab to give the step its own. They start as a copy of the agent’s, and the row below the switch opens the same LLM panel as the Agent page, where you can also pick the step’s model. The settings apply while the conversation is on this step, in chat and on Custom calls; the next step without an override goes back to the agent’s. Realtime calls manage their own reasoning, so they keep the agent’s settings. Turn the switch off to drop the step’s copy.Choose a step’s tools
A subagent’s Tools tab shows the agent’s built-in tools as they are set on the agent; change them on the agent’s Tools page. Let this step end the call leaves closing a call to this step instead of to the workflow. Inherit tools keeps the agent’s own tools on this step. Add tool under Additional tools adds shared tools for this step alone, and the list stays open so you can pick several. Select a tool to open its overview, settings, mocks and logs over the workflow without leaving it. Saving there changes the tool everywhere it is used. On a Tool node, select the sliders beside a tool to edit its parameters. Each one is filled by the LLM from the conversation, a Fixed value, or a Variable. Changes apply when you select Apply.Branch on a tool’s response
On a tool node, the Response tab maps fields of the response into variables. Write each field as a path, such asdata.decision or
items[0].id, and name the variable that receives it. For an HTTP tool the
path starts at the response body; for a code tool, at the value the code
returns. A text, number, true, false or null value is copied as is, and a
variable that receives null reads as not set. When the
response has no such field, or the field holds an object or a list, the
variable is cleared. Each tool node supports 20 mappings, and a path is at
most 200 characters. Result variable still holds whether every tool
succeeded.
Mapped variables appear in the variable pickers. Compare one in an expression
edge, or route on it with a Switch node: choose the variable, then
connect the switch to the next steps. While the switch has no Otherwise
exit, a new connection becomes it; it is taken when no case matches. Other
connections are Cases with the value they match, checked in edge
order, and “42” matches the number 42. A switch supports 20 cases.
Required values
For a conversational questionnaire, start with Templates → Guided intake. It uses a Subagent to ask questions, Update state to save confirmed answers, and expression edges to check them before a tool runs. Edit the prompts and variables for your intake, choose the tool, and give missing answers a follow-up route. New workflows do not need a separate Collect node. Saved workflows with legacy Collect nodes continue to run. Clear values from an earlier attempt before asking again. Test both the answer’s presence and any permission the action needs:false and 0 are
valid answers, but a consent value of false must not authorize the action.
The template includes that separate consent check and a stop route. Use
mock tools in Preview to check refusals, corrections, incomplete answers and
service failures before publishing.
An Update state node reads every value it extracts from the conversation in
one pass. A variable marked Required keeps the value it already holds when
the conversation gives no new one. When the new value is an LLM
evaluation, or the LLM evaluation a Conditional picks, and its answer
is empty or blank text, a Required variable counts it as no value, and an
earlier blank answer counts the same; an optional variable writes it as given.
So do not use empty text as a meaningful answer for a Required value: the
agent asks for it, and after two tries the conversation goes on without it
(the variable keeps what it held before, or stays unset).
On a phone call, when the selected language model uses the configured regional
Google endpoint, an
LLM evaluation also knows the caller’s number (call.lead_number) and the
contact’s name, and uses them only when the caller points to them: “use this
number” or “the number I’m calling from” fills the value with the caller’s
number. A number the caller says is used instead. Other models do not receive
them. With those, make the value optional and give the step that uses it a
fallback, for example a Conditional on the variable that otherwise takes
call.lead_number, or have a Conditional pick call.lead_number itself.
When it has no value at all and the agent is taking an LLM condition
toward the node, the conversation does not move:
the agent asks the customer again and takes the connection once the answer is
clear, so the nodes after it, such as a tool that needs the value, wait for
it. The node’s other updates apply together with it. After the agent has been
turned back twice on the same step, it goes on without the value, so a
customer who has no answer is not asked forever. It also goes on without the
value when a tool already ran earlier in the same move, or when the node is
reached through connections the agent does not choose. On a call, an AI
condition the system checks after a reply waits the same way when the value
is missing: the agent asks the caller for it as soon as nobody is speaking,
once for each thing the caller says. On a call a wait counts toward the two
only once the caller has heard that question, and after four of the
caller’s turns without the value the call goes on in any case. After the
last wait it goes on at the caller’s next words, so the agent’s question is
not cut short.
Nodes and connections open in the inspector beside the canvas. To give the
canvas more room, hide the inspector with the button in its header. Select a
node or connection, or select Inspector at the top right of the canvas, to
bring it back. Drag the divider to resize it, or focus the divider and use the
arrow keys. Select a node’s name in the inspector to rename it. Expand a prompt
or message for more writing space, and type {{ to insert a conversation value
at the cursor.
Hold Command (Control on Windows) and click to select several nodes, or hold
Shift and drag a selection box. Copy, Duplicate, Group and Delete
apply to the selection.
A group runs its own workflow with a Start and named exits. Existing incoming
routes and outgoing conditions are preserved when you group nodes. Choose
Open node group to edit it, then use the breadcrumb to return to its parent.
Groups can contain other groups. Inside a group, End returns through its named
exit; choose that exit on a connection from the group in its parent workflow.
Copy and paste keep all nested nodes, internal connections, exit mappings and
edge order, with new IDs. The main Start is never copied. Deleting a group
also deletes its contents. On the canvas, Command/Control+C copies, +V pastes, +D duplicates and +Z
undoes; add Shift to redo. These shortcuts leave text fields to their normal editor.
Drag a connection’s endpoint to reconnect it. Connections cannot target Start,
leave an End or phone-transfer step, or connect a node to itself. A condition
must be supported by its new source. Select a condition badge to edit that
direction, and select either node name in the inspector to open the node.
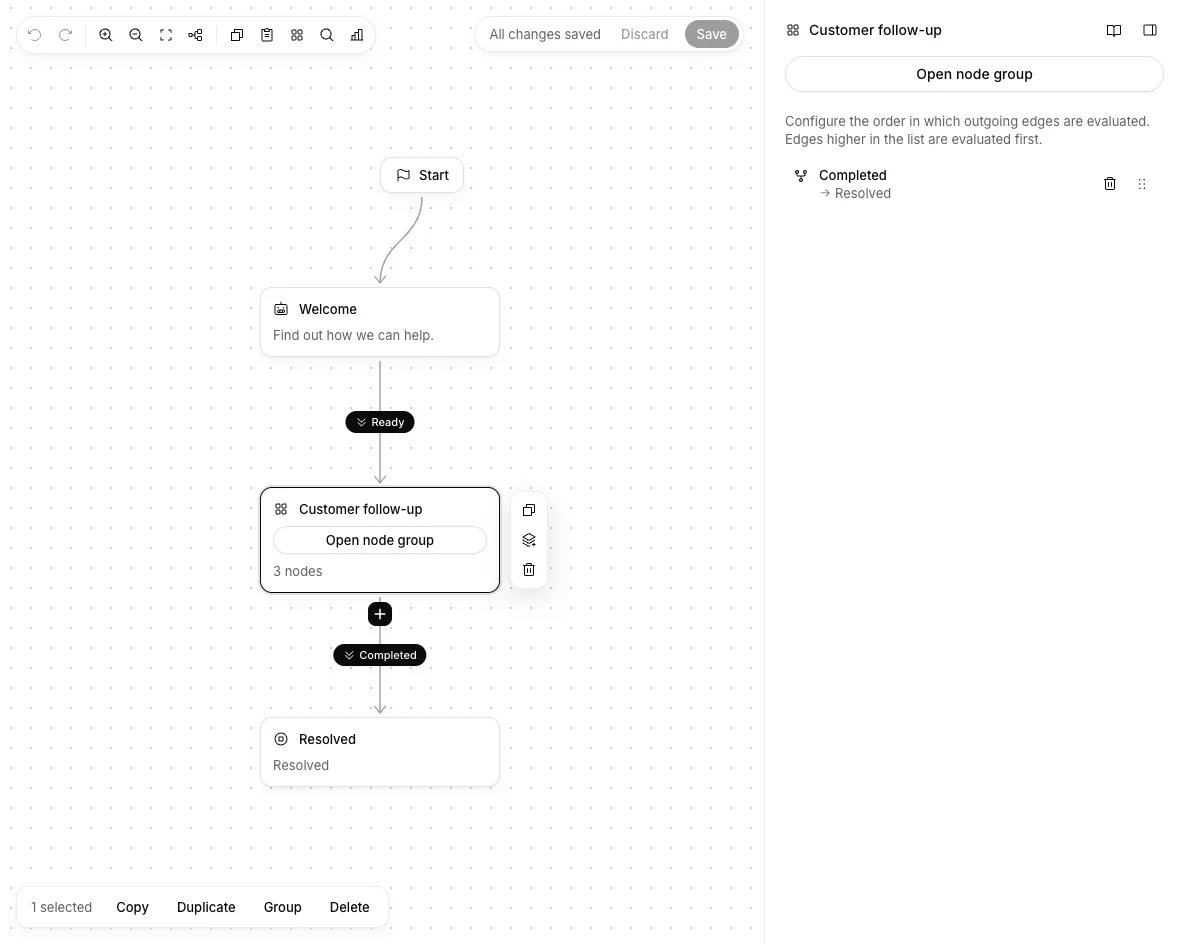
Connect a node group's named exit to the next step in its parent workflow.
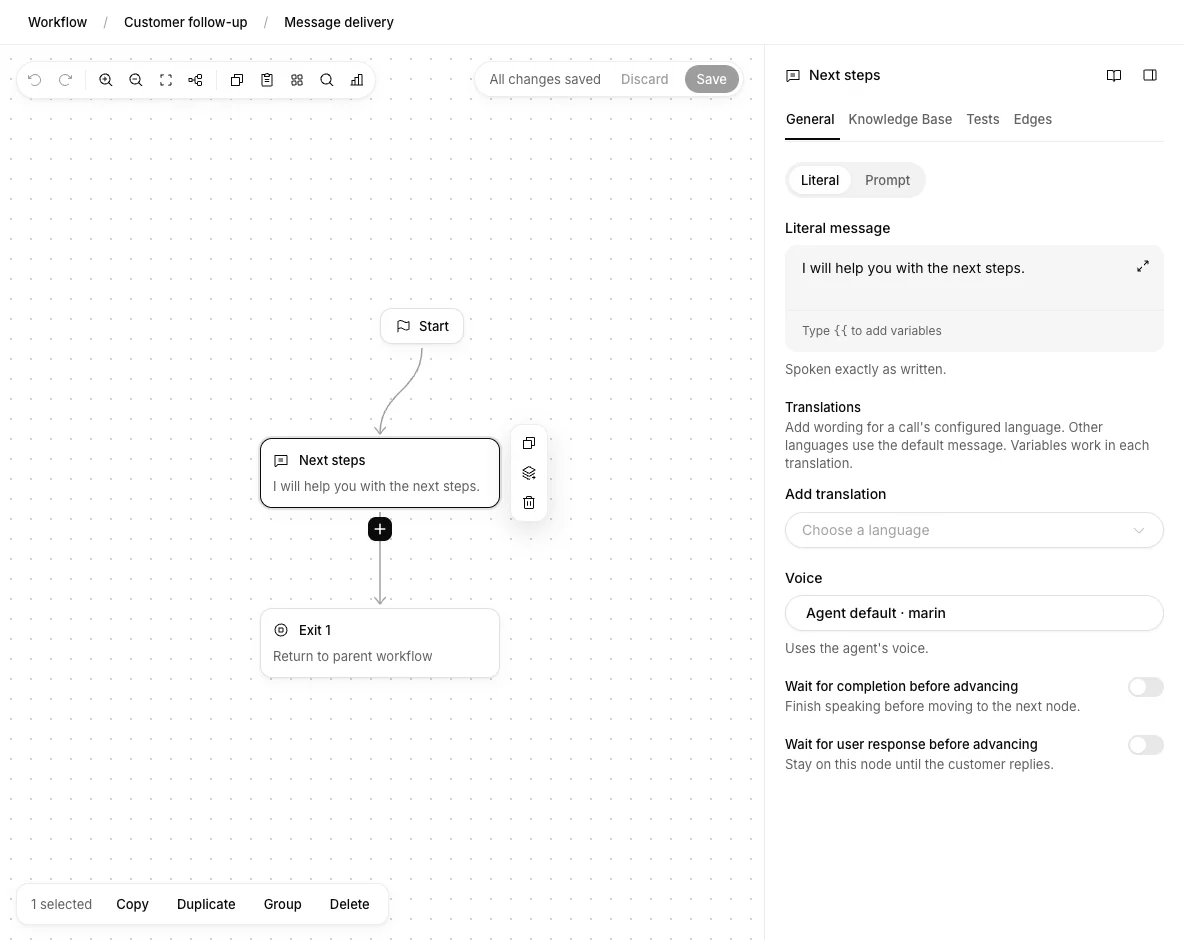
Open nested groups to edit their steps, then use the breadcrumb to return to a parent.
transfer_number response into a text variable, then use
that variable as the destination. The variable must hold the complete phone
number or SIP URI when the call reaches the step. Post-dial digits, such as
an extension, work the same way: type {{ in Digits and choose the
variable. Missing, invalid or sensitive values refuse the transfer and let
the conversation continue.
For SIP REFER, custom SIP headers can pass a fixed value or a conversation
variable to the receiving phone system. Header names must start with X-.
Use User-to-User for a text payload, with {{variable}} placeholders
where needed. Centillion encodes it as hexadecimal and can add an optional
protocol discriminator. Send only the context the receiving system needs.
Sensitive variables cannot be sent in transfer context. These fields depend on support from your phone provider and receiving
system. Caller ID follows your existing trunk settings.
Lines from Centillion transfer to phone numbers in the line’s country
(for a US line, the contiguous US: not Alaska, Hawaii or the US territories),
written with + and the country code and not premium-rate, never to a SIP
address; numbers bought before transfers came to calls
get them once the Centillion team turns them on for your account. A number
connected from your own Twilio account can transfer to any number your Twilio
account allows, or to a SIP address, and one connected before this needs Call Transfer (SIP
REFER) and Enable PSTN Transfer turned on for its Elastic SIP trunk in
Twilio. A call from the website widget has no phone leg to move, so the
agent says it cannot put the visitor through.
An End step says its closing message as you wrote it, then hangs up, without
waiting for another reply. The caller cannot cut the message short, and the
agent answers nothing said over it, so talking over it does not keep the call
going; a request not to be called again is still taken. With no closing
message, the agent says a short goodbye.
Other connections out of a subagent are checked after each of its replies,
so a condition about the caller’s answer is met on the reply after it.
The AI conditions out of a subagent are also checked after each of its
replies, so the call moves even when the agent did not take the connection
itself.
The step the call moves to then speaks first, so a step that asks something
asks it, unless the caller is talking: then it answers what the caller says.
When the call waits on work for more than two seconds with nobody
speaking, such as a tool, a check or the workflow deciding where to go
next, the caller hears a soft typing sound instead of silence. After the
agent’s own reply the sound waits six seconds, since the caller is usually
the one about to talk. When the call moves to its next step after the
agent’s reply or the caller’s answer, the sound keeps playing until that
step speaks, for up to ten seconds; the caller speaking or the call ending
stops it sooner. When a check or
tool runs for 12 seconds with nobody speaking, the agent says once during
that stretch of work that it is still checking and thanks the caller for
holding. A step the call moves
to opens on its own task, and is told which step it is, not to ask again
what was already answered, and not to greet the caller again.
On a call, a step the workflow moves on from by itself (a connection with
no condition, an expression that asks the AI nothing, or a connection into
an End step) does not end the call or promise anything while the workflow
decides where to go: a later step closes it. A step whose connections are
all AI conditions the caller may never meet, such as “Wants a person”, can
still say goodbye and end the call, and so can a step with the End
conversation tool turned on.
The Voice picker offers ready voices from the agent’s current speech provider.
Step voices work with staged speech, stored synthesis configurations and native
duplex voices. The next step restores the agent default when it has no override.
An explicit step model runs on voice calls as well as text conversations. Duplex
calls run OpenAI models only. When a call cannot use a step’s model or voice, it
keeps the agent’s and goes on, and the builder marks the step with a warning.
A workflow supports 60 nodes, including group boundaries,
and 120 connections.
Publish workflow changes before new customer conversations use them.
Evaluate real conversations
Open Evaluations → Configuration to choose the default analysis model, turn on sentiment, topic discovery or Smart search, and define criteria and collected data. Toggles and selections save automatically. Existing criteria and data points save after you pause typing; the side panel shows Saving or Saved. Add a new item once its required fields are complete. Failed saves show an error and can be retried. Analysis settings apply to the selected branch immediately, including eligible conversations from the last 30 days. You do not need to publish agent instructions to change analysis settings.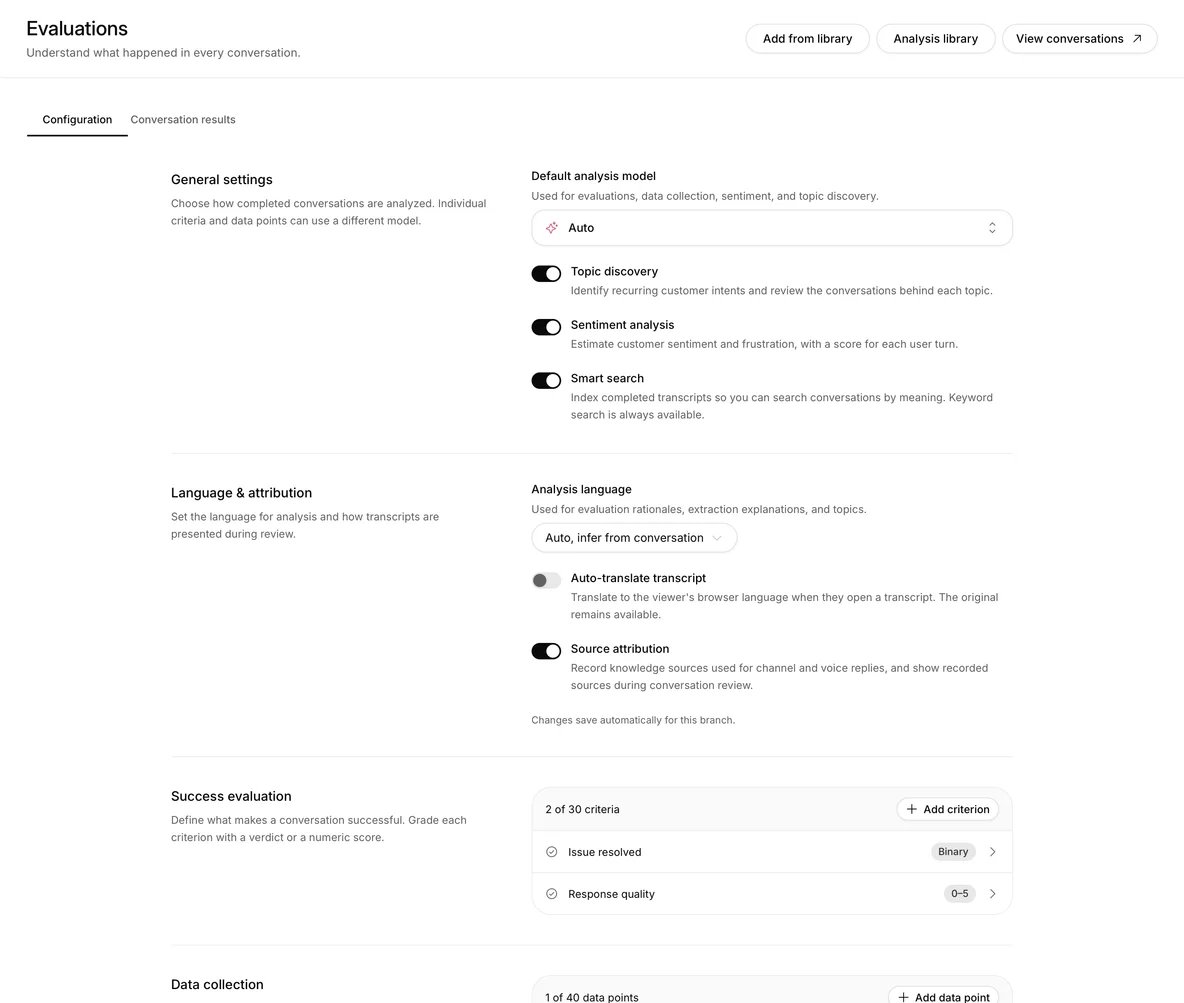
Configure the analysis model, sentiment, topics, search and review language in Evaluations.
Success evaluation
Add a criterion or start with Issue resolved, Accurate handoff or Goal completed. Give it a name and instructions describing the evidence that determines the result. Type @ in the instructions to search and insert a procedure reference. Its instructions are retained with the evaluation run. Use Expand on instructions or a scoring rubric for a larger writing area. Choose:- Binary for success, failure or unknown when evidence is insufficient.
- Numeric for a score from zero to your chosen maximum, from 1 to 1,000. Add an optional rubric explaining how points are awarded. Missing evidence produces an unknown result, not a zero.
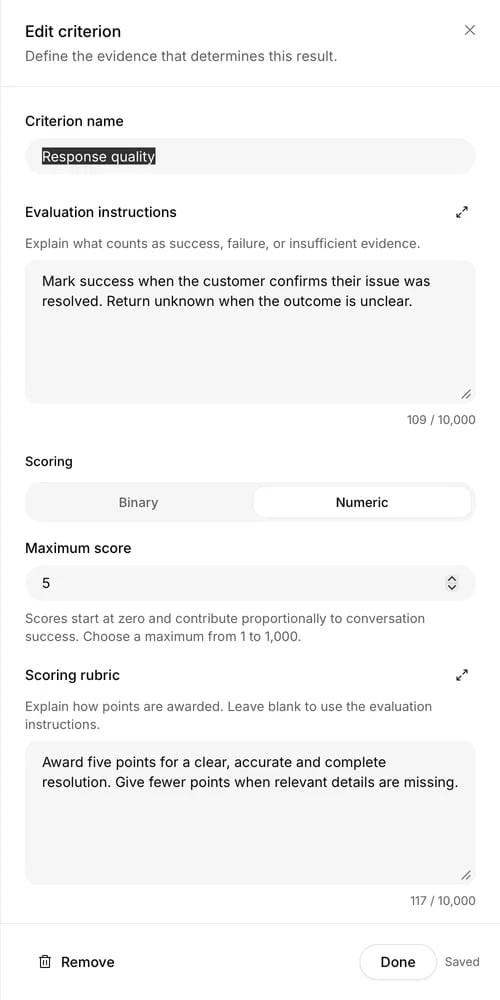
A numeric criterion defines the evidence, maximum score and scoring rubric. Existing items save automatically.
Data collection
Define up to 40 data points. Each needs a unique identifier, extraction instructions, a scope and a type:
Choose an individual model or inherit the default. A missing or ambiguous
value is
null; zero and false remain real values. Review each value’s evidence
in the conversation’s Analysis tab. Data points can be edited, disabled or
removed without rewriting historical results.
Turn on Read from a variable to take the value a conversation variable ended
on, such as a status a tool saved or a batch column, instead of asking a model to
find it in the transcript. Enter the variable’s name in place of the extraction
instructions. No model runs for that field, and a value that doesn’t fit the
type is null. A boolean field accepts true, false, yes and no. Sensitive
variables are left out, and call, contact, campaign and system values aren’t kept
after the conversation, so they can’t be read this way.
Sentiment, topics and search
Sentiment analysis estimates overall customer sentiment from −1 to +1, frustration from 0 to 1, and a trajectory across user turns. It analyzes text, not audio or tone of voice. Scores are estimates to review alongside the transcript. View turn scores exposes the plotted values. Topic discovery assigns up to five short labels to a conversation. Conversation results shows recent sentiment counts and topics; select a topic to see its supporting conversations. Discovered topics also appear in workspace reports and respect excluded topics. Smart search indexes completed transcripts for searching by meaning in Conversations. It requires the embedding service to be configured. Keyword search remains available without an index.Language and attribution
Analysis language controls evaluation rationales, extraction explanations and topic labels. Auto uses the language a voice call recorded, so every criterion of one call is explained in the same language; for a chat it uses the language the customer writes in. Auto-translate transcript uses the viewer’s supported browser language when a review opens; the original transcript remains available from the language selector. Translation uses AI credits and requires permission to manage agents. Source attribution records retrieved knowledge sources with channel and voice replies, and displays recorded sources beside agent messages. Select a source to read its current content. Removed sources can become unavailable. Attribution follows the branch’s saved analysis settings for subsequent replies and does not reconstruct sources for older messages. Web chat continues recording the sources used for its replies.Shared analysis library
Open Evaluations from the workspace sidebar to search criteria and data collection fields by name, type or creator. Choose Import agent items to bring existing agent criteria and data fields into the library, including entries added since your last import.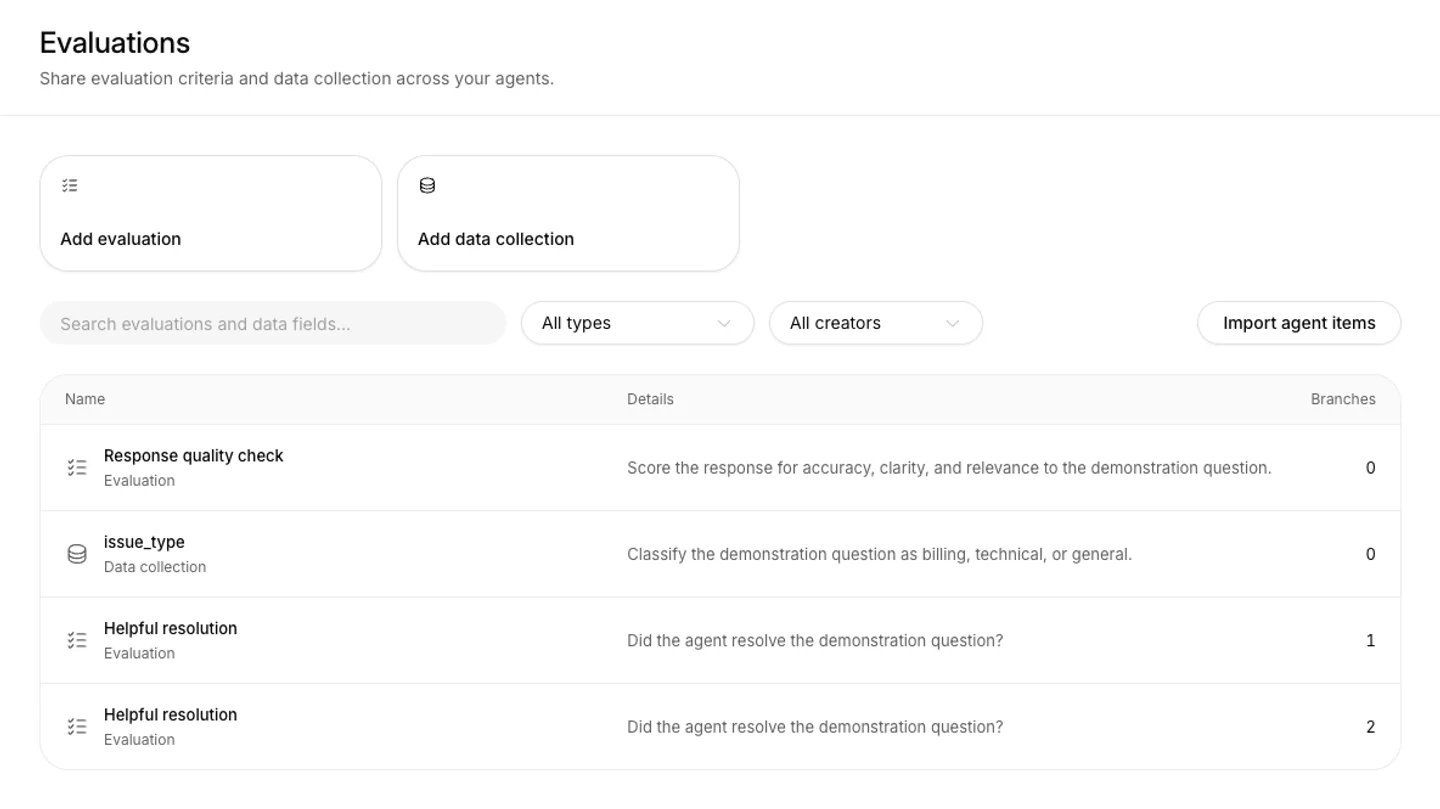
The workspace library lists shared evaluation criteria and data collection fields, with search, type and creator filters.